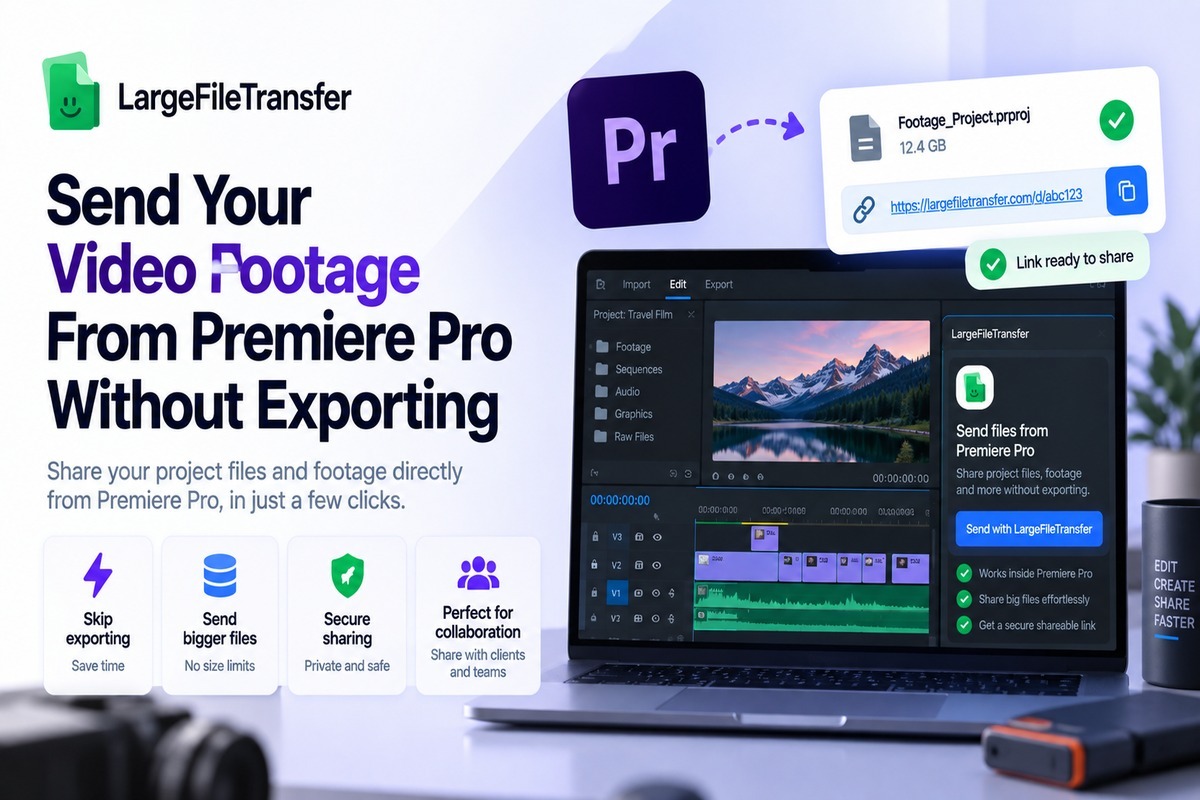
Send Your Video Footage From Premiere Pro Without Exporting
To send video footage from Premiere Pro, you’ll usually need to export the file before you can share it. It feels unnecessary when all you need is to hand off a clip sitting in your timeline.
And that export can easily take longer than the actual delivery, especially with 4K or multi-camera projects. This guide walks through the standard export-and-upload method, shows where it slows editors down, and explains the direct alternative.
First, let’s look at why Premiere Pro’s usual export step exists, and where it starts costing you time.
Why Sending Footage From Premiere Pro Is Harder?
Premiere Pro has no native “send” function, so every delivery method starts by exporting a new file to disk first.
That single requirement creates three separate problems for editors on tight deadlines.
- Exporting a large project can take as long as the edit itself, especially when hardware struggles with demanding footage.
- The exported file duplicates footage already sitting on disk, temporarily increasing storage use while both copies remain available.
- The export must finish completely before uploading can begin, stacking two separate waiting periods back to back.
This workflow makes it harder to send video footage from Premiere Pro when the footage already exists locally.
This is exactly the gap that direct-from-timeline sending closes, which the rest of this guide covers.
How to Export and Upload Footage From Premiere Pro?
Most editors choose one of two export paths depending on who’s receiving the file and what they need to do with it.
Exporting a Review Copy (H.264)
- Select the sequence you need to deliver in the Timeline, then open Export with Ctrl+M or Cmd+M.
- Set the format to H.264 and target roughly 8–15 Mbps when preparing a client-review copy.
- Check the frame size, frame rate, audio settings, and filename before choosing the destination folder.
- Click Export and let Premiere Pro render the review file completely.
- Once rendering finishes, open the export location and upload the resulting file through your transfer service.
- Send the transfer link to the client or collaborator for review and approval.
This produces a smaller, more manageable file suited to approvals, feedback, and review rather than final mastering.
Exporting a Master File (ProRes/DNxHD)
- Select the finished sequence and open Export using Ctrl+M or Cmd+M.
- Choose ProRes or DNxHD based on the recipient’s post-production environment and delivery requirements.
- Match the required resolution, frame rate, audio configuration, and other technical specifications before rendering.
- Keep audio as a separate stem when the receiving workflow requires an independent mix.
- Export the master to a dedicated delivery folder to keep completed assets separate from working media.
- Once the master finishes rendering, upload it through your Premiere Pro file transfer workflow and share the resulting link.
Still moving finished exports between folders before delivery? Send large video files from the files already prepared for handoff.
Master files are substantially larger than review exports, increasing both render time and transfer time accordingly.
Why Exporting Footage Just to Send It Wastes Time?
Exporting makes sense for a finished deliverable, but it adds unnecessary overhead when you only need to share existing footage.
That distinction creates three practical costs for editors who only need to move media already sitting inside the project.
- A 12GB camera original does not need a second 12GB export simply because a client needs access to source footage.
- Every export cycle adds rendering time before upload can even start, extending delivery when source media is already ready.
- Exported copies accumulate on working drives, increasing storage usage and leaving another batch of files to identify and delete later.
Some newer tools read media already linked in a Premiere project and send it directly, skipping export completely.
The LargeFileTransfer Premiere Pro plugin reads media already linked in your project and sends the original files directly, skipping export completely.
How to Send Footage Without Exporting First?
The Premiere Pro plugin docks inside Premiere Pro, reads media already linked to the project, and sends the original files without exporting.
The plugin is available through Adobe Exchange, with installation documented directly on the LargeFileTransfer product page.
How the Direct-Send Workflow Works
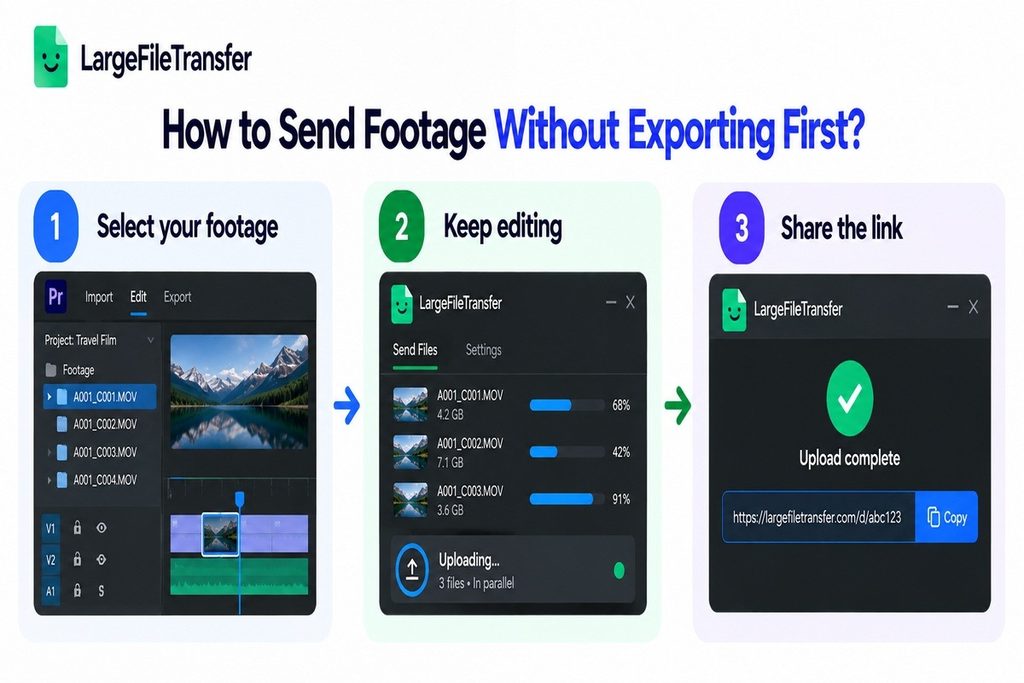
- Select your footage: Choose clips from the Project panel or directly on the timeline to start the transfer.
- Keep editing: The panel finds the original files on disk and uploads them in parallel chunks while you continue cutting.
- Share the link: Once the upload finishes, the plugin generates a share link for your client or collaborator.
What the Plugin Changes
- No export or re-upload: It reads media already linked in the project and sends the original files directly from disk.
- Resumable transfers: Uploads run in parallel chunks and resume automatically after a dropped connection.
- Controlled sharing: Add password protection and set a link expiry before sending the footage.
File Size Limits
- Free: Up to 5 GB per file.
- Pro: No file-size limit.
What to Look for in a Premiere Pro File-Transfer Plugin?
Before choosing a transfer panel, check whether it removes real delivery bottlenecks without disrupting the editing workflow.
| What to check | Why it matters in production |
| Reads linked media directly | Send existing project media: The tool should access linked source files directly, avoiding another exported copy taking up valuable drive space. |
| Resumable uploads | Protect long transfers: A multi-hour delivery should resume after connection loss instead of forcing you to restart from zero. |
| No forced re-encoding | Preserve camera originals: Source footage should transfer without recompression, preserving the codec, resolution, and quality captured during production. |
| Works while you keep editing | Keep the timeline moving: Background transfers should let you continue trimming, reviewing, organizing, and editing without interrupting active Premiere Pro work. |
| Link controls | Control client access: Password protection and configurable expiry dates help manage shared footage when links leave your internal production environment. |
A Practical Comparison
Use these five checks when comparing LargeFileTransfer’s plugin, MASV’s panel, or another Premiere Pro transfer tool. The right choice depends on your footage, delivery frequency, storage constraints, client requirements, and how closely transfer needs to integrate with editing.
Once your transfer workflow is sorted, the next step is protecting source footage during handoff; see how to send RAW video footage to an editor safely.
Common Footage-Delivery Problems and Fixes
Use these quick checks to diagnose the most common delivery bottlenecks without changing your established Premiere Pro workflow unnecessarily.
- Why does my export take longer than the edit itself?
- Fix: Check your codec and export settings first; ProRes and DNxHD exports generally take longer than H.264, so use a faster review preset when appropriate.
- For client approvals, prioritize a practical H.264 review export rather than rendering a high-quality master that adds unnecessary processing time.
- Why does my upload restart after a dropped connection?
- Fix: Use a transfer service with resumable, chunked uploads so interrupted transfers continue from the last completed portion instead of restarting.
- This matters most for large camera originals, remote collaborators, and deliveries that can run for several hours over unstable connections.
- How do I send footage without exporting a new file?
- Fix: Use a Premiere Pro project-panel plugin that reads the original linked media directly, allowing source footage to transfer without creating another export.
- This approach is especially useful when the footage already exists on your working drive and the recipient needs those original files.
- How do I stop a client from re-sharing a private cut?
- Fix: Password-protect the share link and apply a short expiry date, limiting access duration and adding another control layer for sensitive deliveries.
- Short-lived links are particularly useful for unreleased cuts, client previews, campaign footage, and other files that should not remain accessible indefinitely.
For recurring client handoffs, see how video editors move camera originals, cuts, and masters without rebuilding their delivery workflow.
Conclusion
Exporting before sending still makes sense when you are preparing a finished deliverable, but it adds unnecessary friction when you only need to share raw or in-progress footage. A panel that reads media already linked in Premiere Pro removes that extra export step and sends the original files directly from your editing workflow.
The LargeFileTransfer Premiere Pro plugin is currently listed through Adobe Exchange, where editors can install the panel and send selected footage without leaving Premiere Pro.
Skip the export step and get the Premiere Pro plugin to send footage directly from your timeline.
FAQs
- How do I send a Premiere Pro file to someone?
Use Premiere Pro’s Project Manager to collect the project and associated media into one location, then transfer that packaged folder to your collaborator.
- How do I export a video from Premiere Pro?
Select your sequence, choose File > Export > Media or press Ctrl+M/Cmd+M, configure the format and destination, then export the finished file.
- How do I export a video from Premiere Pro for social media?
Select your sequence, open Export, choose an appropriate social-media preset and format, then confirm the resolution and other platform-specific settings before exporting.
- Why can’t I export video from Premiere Pro?
Check your export format, custom presets, hardware-acceleration settings, third-party effects, and Mercury Playback Engine configuration when Premiere Pro fails during rendering or export.
- Can you send footage from Premiere Pro without exporting?
Yes, a Premiere Pro transfer panel can read selected linked media directly from disk and send the original files without creating another export.
- What file size can the Premiere Pro plugin send?
The LargeFileTransfer Premiere Pro plugin supports 5 GB per file on Free, while the Pro plan has no file-size limit.
- Can I keep editing while footage uploads in the background?
Yes, the plugin uploads selected footage in the background, allowing you to continue cutting while the original media transfers from your system.
- How do I protect footage I share with a client?
Use password protection and a configured expiry date on the share link to limit access when sending private client footage.